GENERAL SETUP
1. Inserting paper roll
Refer to inserting paper roll article if roll is not already inserted
2. Charging the battery
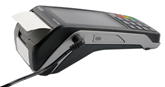
Connect charging cable connector into the circle power port on the left side of the terminal. If your terminal comes with a base, use the base for charging instead.
Plug charger into power source.
3. Turning on terminal
Press and hold green key 
Whenever the terminal connected to power source, it will power up. To power off device, remove terminal from base (if applicable) and power source and press yellow and [.,#*] keys together for a few seconds.
4. Administrator ID and password
The terminal is preprogrammed with a default admin ID = 1 and password which is required to perform some functions. For security, please call or email our support team for access to your password.
The Move5000 terminal supports WiFi (terminal only), 4G/3G mobile (terminal with sim card), and Bluetooth (terminal and base). Choose the setup below corresponding to the communication model you ordered.
SETTING YOUR COMMUNICATION MODE
Below steps are for Canadian terminals, for US terminals see Ingenico Move 5000 (US)
From home screen press [.,#*] key or tap on ADMIN
Press [3] Setup menu
Press [2] Communications
Press [1] Coms Priority
Select Coms priority 1,2,3 accordingly and press [Enter] (green button) (i.e. for WiFi only terminal it should be WiFi, none, none).
WiFi - 400
GPRS / Mobile Data (mobile sim) - 300
IP/Bluetooth - 200
Note: 4 indicates WiFi, 3 indicates GPRS (Mobile Data), 2 indicates IP and 0 indicates no backup. (i.e., for a sim based with WiFi backup it would be Mobile Data, WiFi, none or 340)
Press cancel (red button) until terminal is back on main screen
**If changing comms priority from how the terminal was shipped, please let our support team know so we can have the file rebuilt to match the terminal change.
WIFI BASED TERMINAL SETUP
1. General Setup
Follow steps 1-4 above
2. Confirm your communications
Confirm your comms priority is set to WiFi
3. WiFi Setup
Press [3] Setup menu
Press [2] Communications
Press [3] WiFi
Toggle 1 - WiFi On or Off
Select 2 - WiFi Easy Conn to search and connect to your Wireless signal
Note: If you have multiple routers at your business make sure they have unique names / passwords to avoid the terminal bouncing between the two connections.
Select 3 - Advanced Setup if your IT administrator needs to setup advanced settings for WiFI connection (i.e static IP).
If properly connected, the WiFi indicator should turn green 
4. Test a transaction
SIM CARD (4G/3G) BASED TERMINAL SETUP
1. General Setup
Follow steps 1-4 above
2. Confirm your communications
Confirm your comms priority is set to GPRS as the primary one
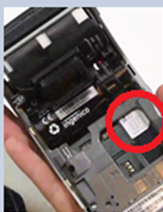
3. Insert/confirm SIM card inserted
The terminal should come with the sim card already inserted behind the back cover. If however it is not there, there should be a card in the box to insert in the space indicated.
4. Connecting to mobile data
The terminal should automatically connect to mobile network
When network is being used the indicator will display on the top left of screen and should be green to indicate connection. 
If the terminal has not connected:
From the home screen press [.,#*] key or tap on ADMIN
Press [3] Setup Menu
Press [2] Communications
Press [4] Cellular/Mobile Data
Select APN (make no changes)
Back out of menu by pressing cancel (red key) and the terminal will attempt to start cellular connection.
5. Test a transaction
BLUETOOTH BASED TERMINAL SETUP
1. General Setup
Follow steps 1-4 above
2. Confirm your communications
Confirm your comms priority is set to Bluetooth as primary
3. Plugging in base
Remove back cover from backside of base and connect the power cable to the inside of the base then replace cover. Plug the charger into the power source. 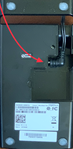
Connect the Ethernet cable (blue cable) to the port located on the back of the base (other two ports are printer and usb)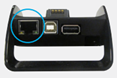
4. Setting Up Bluetooth
From the home screen press [.,#*] key or tap on ADMIN
Press [3] Setup Menu
Press [2] Communications
Press [5] Bluetooth
Press [1] New Base and put terminal on the base
Press cancel (red button) to go back to main menu
Terminal will connect to base and display base association ok message if successfully paired.
Both ETH and Bluetooth indicator lights should be green for successful connection
If you see grey Bluetooth icon - Bluetooth is active on terminal but not connected to base (orange means it is searching for base)
5. Test a transaction